
Benchmarking helps optimize code performance and identify resource hoggers. In this journey of code optimization for performance we also understand the language better. This post will walk you through the whats, whens, whys and hows of Go benchmarking.
WHAT is a benchmark ?
A benchmark is a measurement of how performant a piece of code in an application is. It also gives you the baseline performance measurements of your code.
WHEN to benchmark ? In our setup we do not write benchmark tests as diligently as we write unit tests, as in we do not write a benchmark for every function. We write benchmarks for functions that are notorious to hog resources.
WHY should we benchmark ?
Benchmarking your code will help you understand the performance metrics of the methods in your application. You can also use it as a baseline measurement when that piece of code is modified, so as to ensure the performance does not degrade significantly after the modification.
HOW to benchmark in go ?
Good news is that the benchmarking facility is builtin part of the testing package in Go. There are no pre requisites steps to be followed. So lets get GOing !!
5 simple steps for benchmarking in Golang:
STEP 1. Setup workspace > mkdir -p github.com/sshetty10 && cd ~/go/src/github.com/sshetty10 > git clone https://github.com/sshetty10/go-seed-db > go build STEP 2: Write the Benchmark test
You can write the benchmark test part of the same test file you have your unit tests. This keeps things functionally contained in the same file. You can run just the benchmark tests and skip all the unit tests for this test file by a simple command line argument mentioned further in this post. If you are using go-seed-db, open ~/go/src/github.com/sshetty10/go-seed-db/resolver_test.go. LicenseState was a function which came up in our pprof stats as a good candidate for improvement. You can check more about profiling your app in my post here. We will write our benchmark test for LicenseState as below.
func BenchmarkLicenseState(b *testing.B) {
    ctx := context.Background()
    tr := &model.Trainer{
        ID:        id,
        Name:      "somenewtest",
        City:      "somecity",
        Age:       70,
        LicenseID: "VA-38274",
    }
    for i := 0; i < b.N; i++ {
        resolver.Trainer().LicenseState(ctx, tr)
    }
}
This benchmark test will run for the given input, tr, b.N number of times. If you need a benchmark test to run for a range of inputs, you can make the benchmark function private by using a lowercase for the initial letter of the function name and pass the model.Trainer as an input object. You can then call this function with different input parameters as so
func benchmarkLicenseState(tr *model.Trainer, b *testing.B) {
    ctx := context.Background()
    for i := 0; i < b.N; i++ {
        resolver.Trainer().LicenseState(ctx, tr)
    }
}

func BenchmarkLicenseState1(b *testing.B)  { benchmarkLicenseState(&model.Trainer{ID:id,Name:"foo",City:"bar",Age:70,LicenseID: "VA-38274",}, b) }
func BenchmarkLicenseState2(b *testing.B)  { benchmarkLicenseState(&model.Trainer{ID:id,Name:"foo",City:"bar",Age:70,LicenseID: "MD-38274",}, b) }
func BenchmarkLicenseState3(b *testing.B)  { benchmarkLicenseState(&model.Trainer{ID:id,Name:"foo",City:"bar",Age:70,LicenseID: "NY-38274",}, b) }
STEP 3: Run benchmarks and Analyze the stats
> go test -run=XXX -bench=. -benchmem -cpuprofile prof.cpuA prof.cpu file will get generated in your project directory. Analyzing the command:
-run=XXX will skip all the unit tests.
-bench=. will run all benchmark tests in the current directory.
		The argument to -bench is a regular expression that  				specifies which benchmarks should be run, which is helpful when you want to run a subset of your benchmark functions.
-benchmem will benchmark memory profile
-cpuprofile will benchmark CPU profile

prof.cpu is the output file. Profile stats will be generated in this file.

optional params:
-count 5 = runs benchmark 5 times OR
-benchTime = 10x will run 10 iterations of each benchmark
-benchTime = 10s will run each benchmark for 10 seconds.

b.N is not a fixed value. By default a benchmark test runs for 1 second. b.N i is increased in the sequence 1, 2, 5, 10, 20, 50 dynamically to accommodate as many iterations it can until that 1 second has elapsed.
To view the stats collected in prof.cpu we will use go tool pprof.
> go tool pprof go-seed-db prof.cpu
(pprof)
Analyzing the command:
prof.cpu profile file was generated during the go test process
go-seed-db is the name of the executable for which the prof.cpu was created.

Fig. 1.1 Fig 1.1 shows the memory and CPU stats in prof.cpu after running our benchmark. To see the exact lines of code which can be optimized run the top10 -cum command. This gives the cumulative top 10 list of lines of code which are taking up the maximum share of time spent in this function call.
(pprof) top10 -cum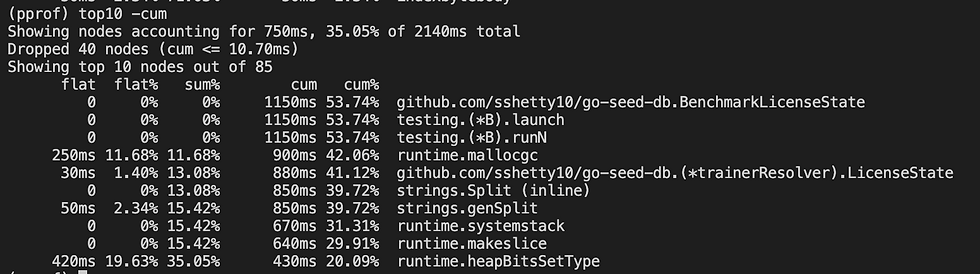
Fig. 1.2 STEP 4. Optimize your code Fig 1.2 shows that the strings.Split is a function line we can optimize. LicenseState splits the license ID of the format VA-74653 on the "-" separator to get the state code which are the 2 characters before the hyphen. We do not care about the rest of the hyphens in this case and just need all characters before the first hyphen. Split function will return a slice of strings which we do not use and so can get rid of. Old Code with strings.Split:
func (r *trainerResolver) LicenseState(ctx context.Context, trainer *model.Trainer) (string, error) {
    licenseState := strings.Split(trainer.LicenseID, "-")[0]
   	return licenseState, nil
}
Optimized Code
func (r *trainerResolver) LicenseState(ctx context.Context, trainer *model.Trainer) (string, error) {
	idx := 0
	for idx < len(trainer.LicenseID) {
		if trainer.LicenseID[idx] == '-' {
			break
		}
		idx++
	}
	licenseState := trainer.LicenseID[:idx]

	return licenseState, nil
}
STEP 5: Run Benchmarks again
> go test -run=XXX -bench=. -benchmem -cpuprofile prof.cpu

Fig. 1.3
> go tool pprof go-seed-db prof.cpu
(pprof)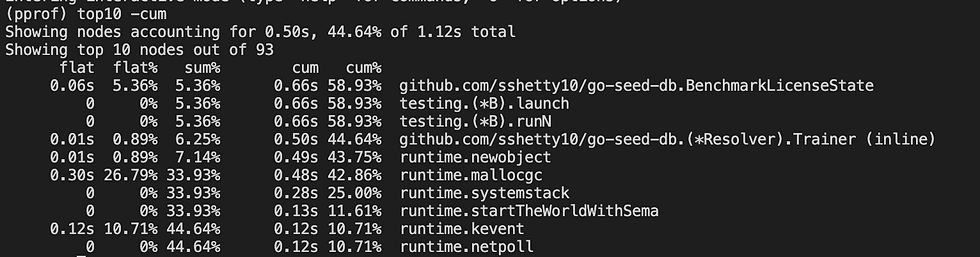
Fig. 1.4
Stats before optimization : 9065338 operations
168.1 ns/op - CPU
40 B/op - the average number of bytes allocated per operation
2 allocs/op - the number of allocations per operation Stats after optimization:
35262470 operations
30.37 ns/op - CPU
5 allocs/op - the average number of bytes allocated per operation
1 allocs/op - the number of allocations per operation
That was a significant improvement with just a few lines of code.
Conclusion
I have said this in most of my optimization posts and I cannot help but reiterate it again that code optimizations can be very addictive. As developers, I believe, it is our responsibility to the rest of the development community to write readable well commented code. In short, we should know when to stop optimizing our code. Looking at merge requests day in and day out, I personally believe that there needs to be a balance between code optimizations and readability of code. Have fun benchmarking !!!
References: https://dave.cheney.net/2013/06/30/how-to-write-benchmarks-in-go
Comments